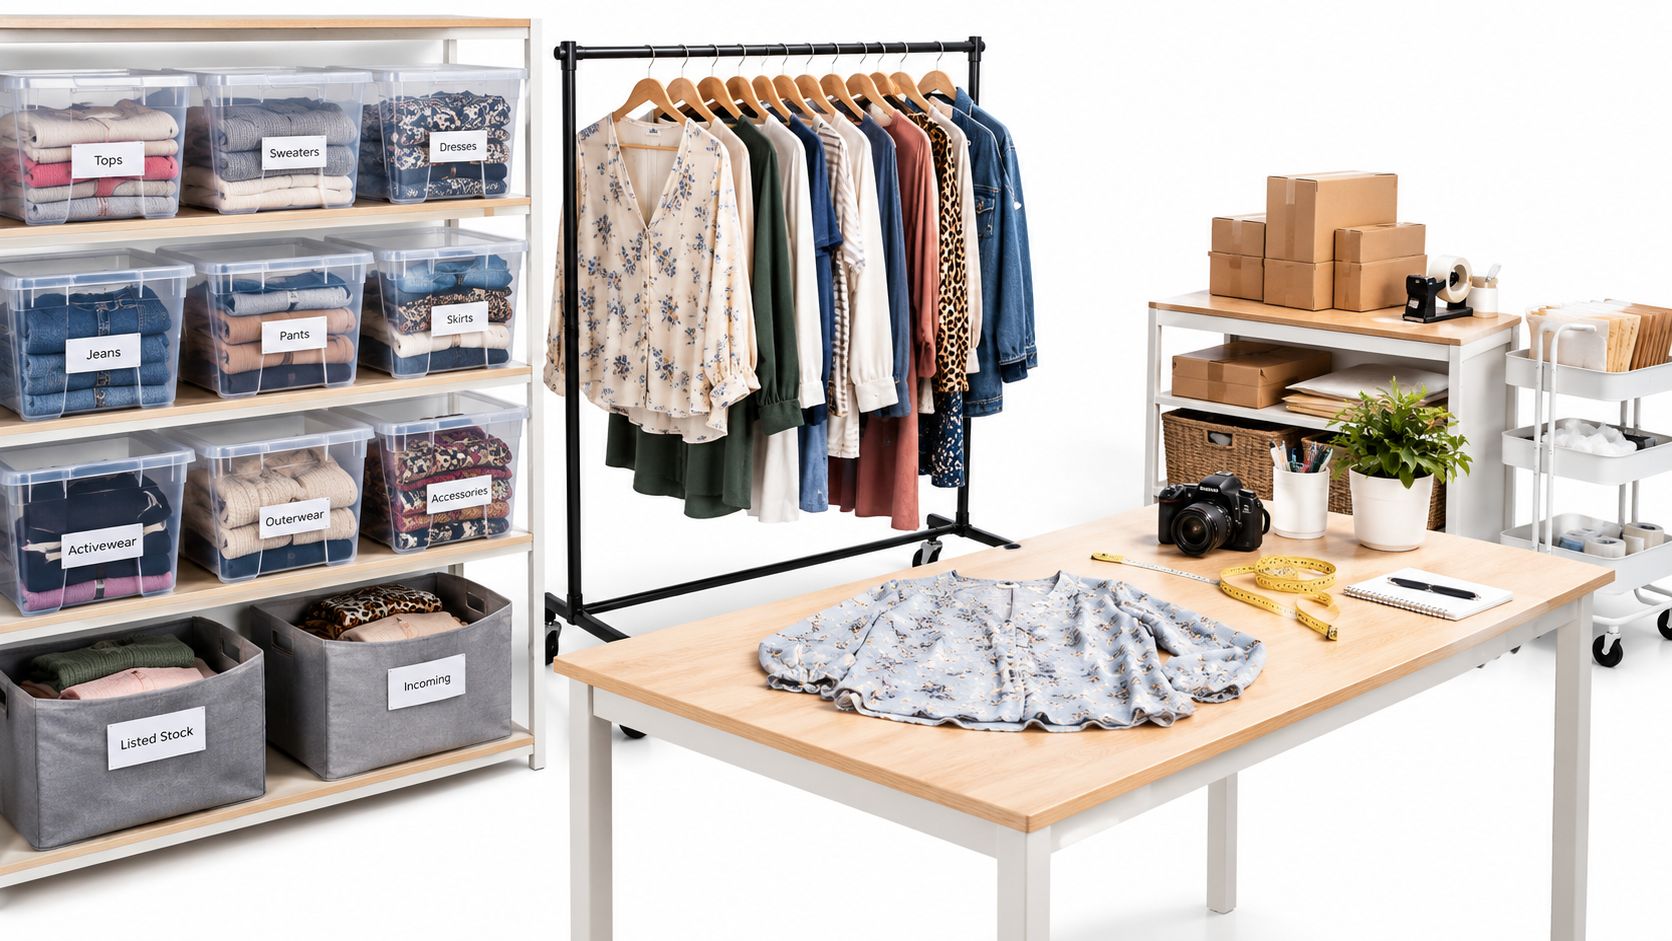
A mixed-brand box arrives on Tuesday. By Sunday, a listed dress, three uninspected blouses, and a sweater you haven't photographed are sharing the same shelf, and a buyer has just purchased the dress. That scramble is usually a workflow problem, not a space problem. Learning how to store Poshmark inventory starts with moving each piece through clear stages, so you can find it, trust its condition, and ship it without a search.
Table of Contents
- Build Storage Zones Before Buying Bins
- Climate Rules for Garages, Basements and Attics
- Choosing Containers by Garment Type
- How to Assign SKUs and Shelf Positions
- Pick, Pack and Count Stock From Storage
- Run a Quarterly Keep, Rework, Discount or Exit Review
Build Storage Zones Before Buying Bins
That box on the spare room floor looks harmless. Open it without a plan and you'll sort by memory, stack clean pieces on unchecked ones, and list something before you notice a stain under the arm or a missing button.
Most storage advice starts too late. Poshmark's inventory management guide recommends bins, racks, labels, and its Inventory Report, but it doesn't clearly define separate zones for received stock, inspection, steaming, photography, listed stock, sold orders, returns, and damaged items. Real sellers end up with racks, cardboard boxes, pallets, bags, and totes at once, which a single bins-only answer doesn't solve.
Treat Storage as a Pipeline
Think in stages, not containers. An item earns its place in Listed only after you've inspected it, photographed it, measured it, assigned a SKU, and finished the listing. Until then, it stays physically separate. If you're still working out the wider business around this habit, starting a clothing resale business with a simple operating routine helps you connect sourcing, storage, and listing from day one.
| Zone | What Goes There | Rule That Prevents Errors |
|---|---|---|
| Received | Unopened box contents, counted but not yet inspected | Nothing here gets listed; count and log cost first |
| Inspection | Items awaiting condition check | Check odor, stains, missing buttons and insects; isolate anything doubtful |
| Processing | Items being steamed, photographed and measured | One clean surface with good light and a tape measure |
| Listed | Active stock with a SKU, a finished listing and a master sheet entry | Only items here are available to buyers |
| Sold and Packing | Orders waiting for a label or pickup | Pull from Listed and keep separate until shipped |
| Returns | Items sent back, awaiting re-inspection | Re-check condition before returning to Listed |
| Damaged or Rework | Stained, torn or unsaleable pieces | Decide rework or exit at the quarterly review |
Zones don't need walls. A labeled shelf, one tote, or the corner of a table works if the boundary is consistent and everyone handling stock respects it.
Don't chase maximum density too early. Vertical racks and tightly packed totes save floor space, but a clear processing surface and easy access to incoming stock usually produce faster listings and fewer mistakes. Crowded intake is where odor, sizing errors, and authenticity questions slip through.
Practical rule: If you can't point to exactly where every unlisted item sits and say whether it's been inspected, your zones aren't working yet.
Run that check today. Separate anything unprocessed from sale-ready stock before you buy another bin.
Climate Rules for Garages, Basements and Attics
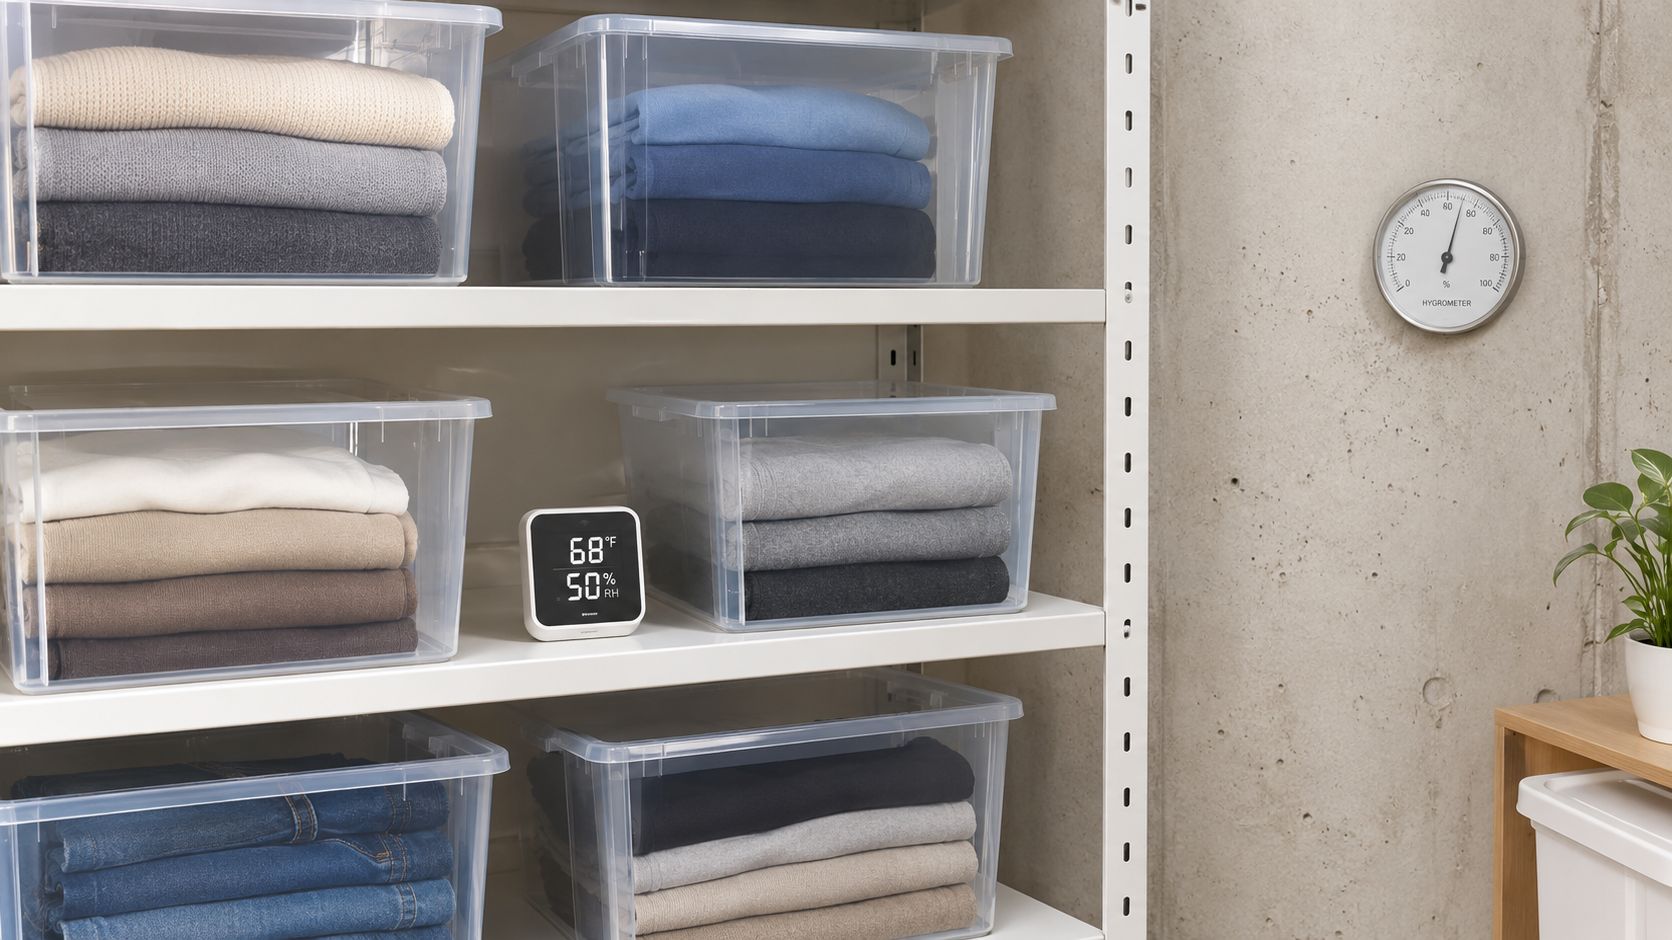
For apparel held long-term, aim for roughly 65-75°F (18-24°C) and about 45-55% relative humidity. Averages can mislead you, so use an inexpensive temperature and humidity logger to catch overnight or seasonal excursions.
The National Park Service textile guidance warns that high heat accelerates embrittlement, high humidity promotes biological activity and pests, and humidity below 35% can also make textiles brittle. Fluctuations cause harm even when average conditions look acceptable, which is why a room that feels fine at noon can still damage stock.
The shelving below shows the kind of raised, monitored setup that keeps you ahead of those swings.
| Location | Main Risk | Action |
|---|---|---|
| Garage | Heat swings, humidity, dust and insects | Move stock indoors; avoid direct sun and bare concrete floors |
| Basement | Dampness, mildew and musty odor | Run a dehumidifier, elevate bins, keep garments dry before bagging |
| Attic | Extreme heat and temperature swings | Avoid for apparel unless the space is climate-controlled |
| Spare room or closet | Usually stable; dust and light exposure | Good default; keep away from exterior walls and windows |
| Climate-controlled unit | Stable temperature and humidity at higher monthly cost | Best for high-value or long-holding stock |
Placement and Moisture Rules
Put shelving at least several inches above the floor. Keep it away from exterior walls, plumbing, windows, and direct sunlight, and leave gaps so air can move between bins.
Garments must be completely dry before bagging. Sealed plastic traps damp air against fabric and speeds mildew, so airtight containment is the wrong fix for a slightly damp piece. Dry it first, then decide on a container.
Vacuum the storage area routinely. If an item smells musty or shows spots, isolate it in a sealed inspection container until you've cleared it, rather than returning it to a shared bin where the problem can spread.
Choosing Containers by Garment Type
Pick the container by garment type and value, not by what's cheapest that week. A structured blazer, a stretchy knit, and a low-value tee don't fail in the same way, so they shouldn't be stored the same way. Closet Witch's inventory organization tips reflect the common emphasis on bins and labels, but sellers still need a clearer decision framework for bags, racks, bins, and climate-controlled space.
| Container | Best For | Watch Out For |
|---|---|---|
| Breathable fabric garment bag | Dresses, blouses and lightweight tops | Dry fully before bagging; the bag should not be airtight |
| Numbered polybag | Low-value items awaiting listing or shipping | Use only on fully dry items; switch to fabric for long holds |
| Hanging rack with padded hangers | Structured jackets, blazers and wrinkle-prone dresses | Uses more wall or floor space |
| Lidded plastic bin | Folded knits, shoes and accessories in bulk | Do not overfill; check for moisture in humid rooms |
| Cardboard box | Short-term intake only | Can discolor garments; wrap items or move them out |
| Folded shelf storage | Knits and stretch-sensitive pieces | Fold, never hang knits; keep off the floor |
Two Exceptions Sellers Miss
Cardboard is temporary. Sellers report discoloration when garments sit in boxes, and some wrap each item before boxing it. Use cardboard for short intake only, then move pieces into their long-term container.
Bagging everything isn't free. Individually bagging every low-value item adds labor and packaging expense without improving sell-through. Separate protective packaging from shipping packaging, and reserve full bagging for high-value, delicate, or dust-prone pieces. Hanging protects shape and reduces wrinkles, but it eats space, so save rack room for items that crease or lose structure when folded.
Use a simple test. If an item would show a crease, odor, or color change after a month in its container, switch containers now, not after a buyer complains.
How to Assign SKUs and Shelf Positions
A SKU system only works if you assign it at the same point in the workflow every time. The flow below maps the put-away sequence from inspection to verified storage.
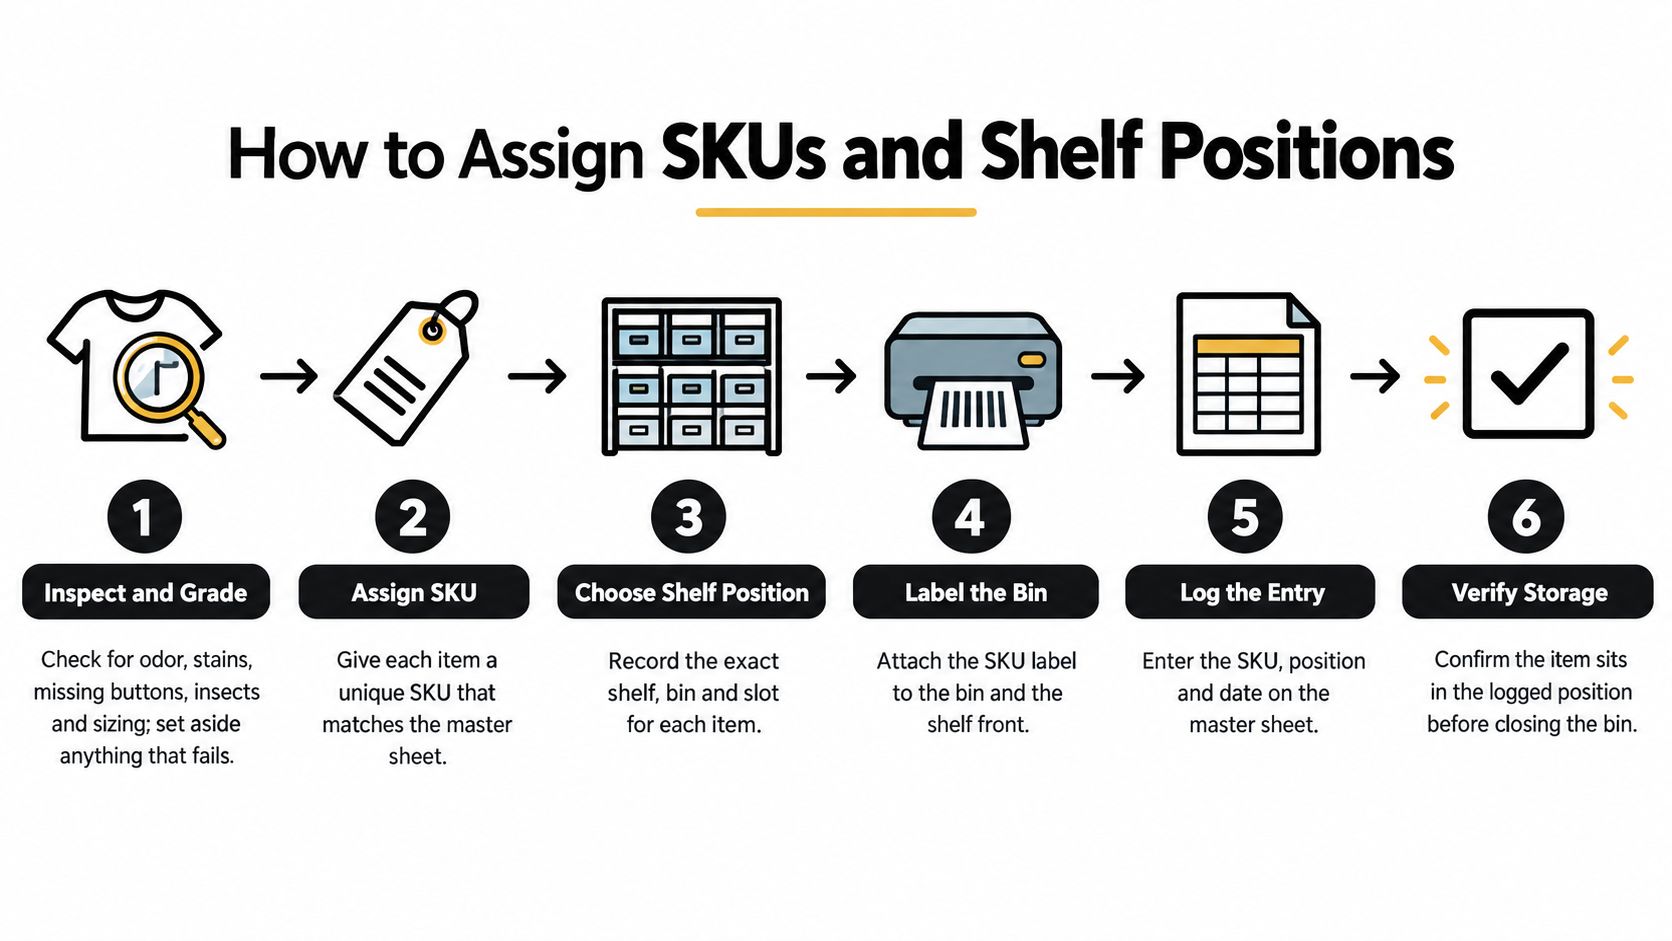
Follow these steps in order, and don't let an item skip ahead because you're in a hurry to list.
- Inspect and grade the item. Check odor, stains, missing buttons, insects, concealed damage, and sizing. Photograph defects, assign a condition code, and set aside anything questionable instead of mixing it with sale-ready stock.
- Photograph and measure it. Your listing and your records depend on these details. Do this while the garment is already on your processing surface, not after it's bagged.
- Assign a permanent SKU. Encode at least category, size, color, and a sequential number, for example DRS-M-BLK-014. One item gets one code for its whole life in your closet.
- Enter the SKU in the Poshmark listing. The code in the listing, on the bag, and on your sheet must match exactly. That's what makes the item searchable later.
- Bag and label it. Place the fully dry garment in a numbered, breathable polybag or fabric bag. Don't compress it tightly, since overcrowding restricts air circulation.
- Assign a shelf position and log it. Use a position such as R03-B07, then record SKU, title, cost, list date, storage position, condition, and sale status on your master sheet. A simple planner habit helps here, and using a daily orders planner to keep stock tasks on schedule can keep put-away from piling up.
- Verify at put-away. Scan or manually check the SKU as you shelve it. You'll check again when it sells, creating a two-point check that catches mis-picks before shipping.
Where the System Usually Breaks
The common slip is writing the position on the bag but never updating the sheet. That item is effectively lost, even though it's sitting in plain sight.
Te Papa's guidance on caring for textiles and clothing supports accurate labeling because it minimizes handling and retrieval time, and recommends keeping clothing clean, dark, ventilated, and off the floor. Less handling means less abrasion and fewer chances to crease, soil, or misplace a piece.
This short video walks through a similar put-away routine, so you can compare it with your own shelf setup.
Keep the format boring and consistent. Clever codes you have to decode under time pressure will fail you on a busy shipping day.
Pick, Pack and Count Stock From Storage
An order should trigger a sheet check before a shelf search. As order volume grows, the master sheet helps you find the right piece without opening bags or disrupting nearby stock. Treat each pull as the final handoff in the inventory pipeline, from stored item to sale-ready parcel.
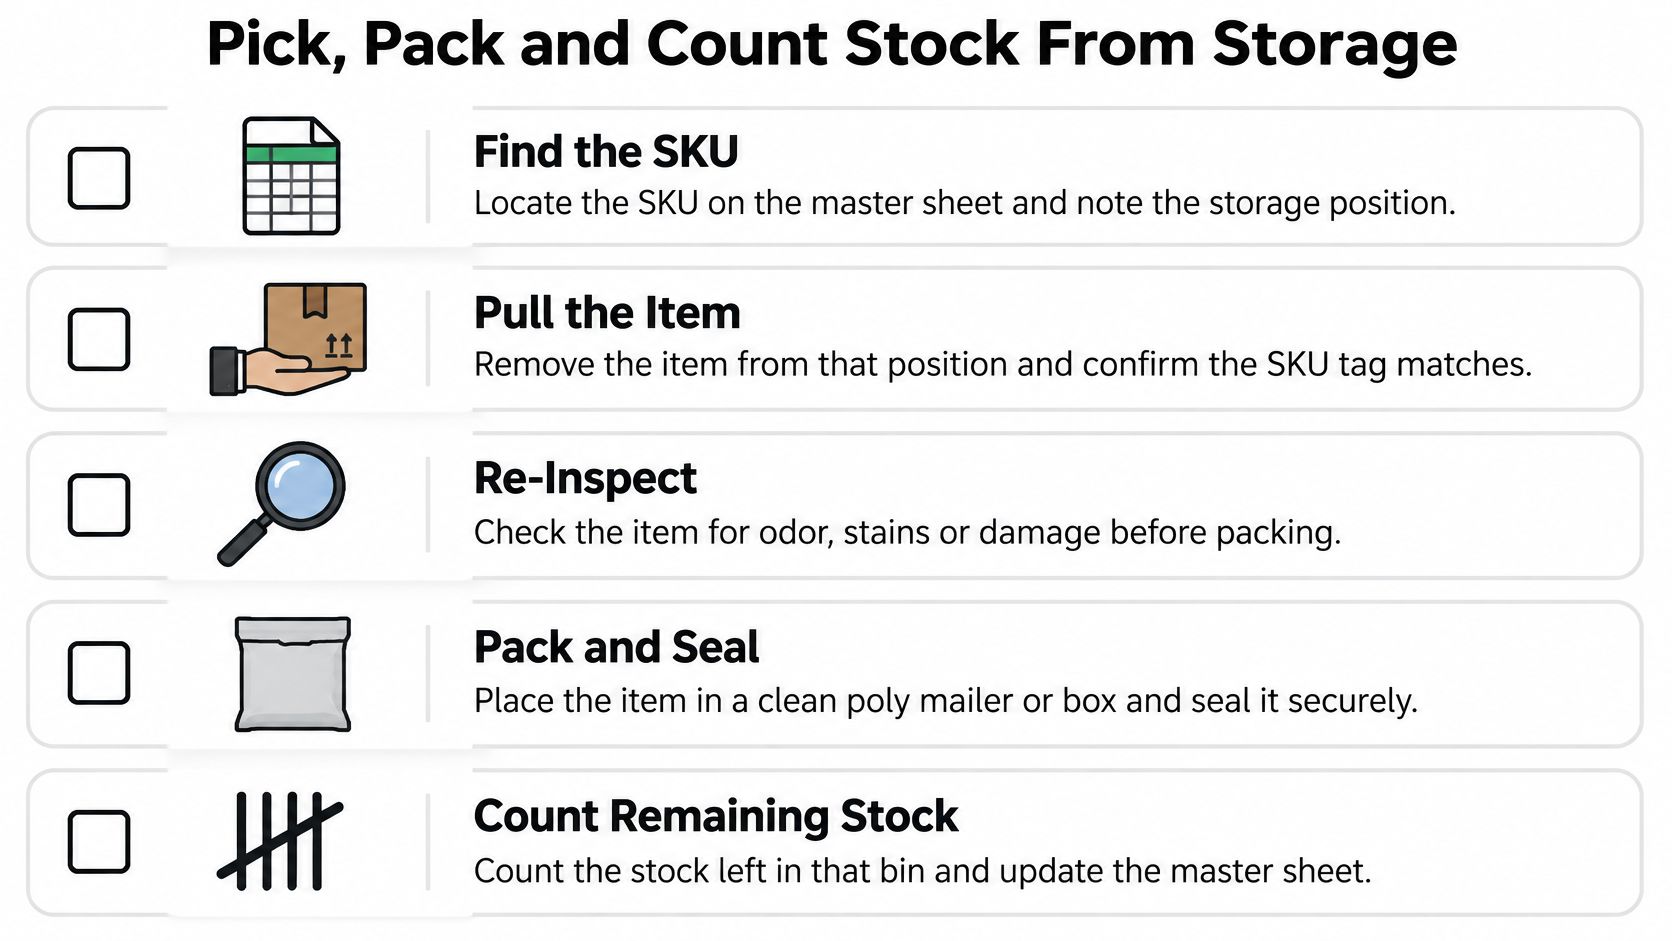
- Find the SKU on the master sheet. Read the recorded storage position before moving anything. Sellers new to the listing-to-shipping process can review how to start selling on Poshmark to understand how listings feed into order fulfillment.
- Pull from that exact position. Match the SKU on the bag to the sheet. If they do not match, stop and check the garment tag before packing.
- Compare the current condition with the listing photo. Check for changes in odor, stains, or damage. Log any change before packing, so the record reflects the item's condition and you can decide whether to proceed with the order.
- Add protective wrapping. Use a clean sleeve or bag to keep the garment clean in transit. Delicate pieces need the extra protection most; sturdy, low-value items may be fine with a clean sleeve.
- Pair it with a shipping mailer. Keep the protective layer separate from the outer shipping packaging. That distinction saves storage bags for garment protection rather than postage.
Count Little and Often
Run a weekly cycle count on high-turnover bins instead of waiting for an annual count. If the sheet and shelf disagree, recount the bin and correct the record that day.
A mismatch between sheet and shelf is a stop signal, not a packing shortcut.
Keep shipping supplies beside the packing surface, group bins by SKU prefix so pulls usually stay on one shelf, and remove sold pieces from Listed zones before the next listing session. These small steps keep stock moving from storage to shipment without adding a complicated system.
Run a Quarterly Keep, Rework, Discount or Exit Review
Storage becomes a carrying-cost problem long before it looks like one. Every unsold piece holds shelf space, ties up cash you spent sourcing it, and adds handling every time you count around it.
Run a quarterly pass across your master sheet and the Poshmark Inventory Report. Flag items unsold past a cutoff you set, for example 90 days, and estimate the shelf space each one occupies.
For every flagged item, choose one outcome.
- Keep: The price still matches demand and the piece is worth its space.
- Rework: Re-photograph it, fix the condition issue, and relist it. Send it back through Processing before it returns to Listed.
- Discount: Apply a markdown or build a bundle to move it while it's still presentable.
- Exit: Donate it, liquidate it, or sell it as part of a lot and reclaim the shelf.
Record each decision on the master sheet beside the item's SKU. The next review should start from those notes, not from your memory of why you kept something. Use the same pass to time purchases, so when sale-ready stock in a category thins out, your next order lands before that shelf empties.
Do three things this week. Schedule the review, export your master sheet, and pick the first 20 items to check. That small batch will show you whether your storage is supporting sales or quietly storing your budget.
When your shelves thin out in a category that sells, OneTrendyCloset offers curated brand-name liquidation boxes and custom lots you can run through the same intake, SKU, and zone system described here. Choose a box size that fits your available processing space, inspect each piece before it joins Listed stock, and restock with a pipeline that stays organized from delivery to shipment.